

How To Change Hair Color In Photoshop 2018

Irresolute Pilus Color In An Epitome With Photoshop
In this photo retouching tutorial, nosotros're going to look at how unproblematic and easy it is to change hair colour in Photoshop by tinting and colorizing someone'due south hair in a photo. The technique we'll exist learning hither gives us complete control over what we're doing, with several different means of fine-tuning the results, plus we tin can also go back any time we want and change the hair colour without having to redo all the work! You tin utilise this technique on photos of other people (friends, family, clients), or y'all tin can fifty-fifty use it on a photo of yourself to meet how dissimilar pilus colors would await on you!
Hither's the paradigm I'll exist using for this tutorial:
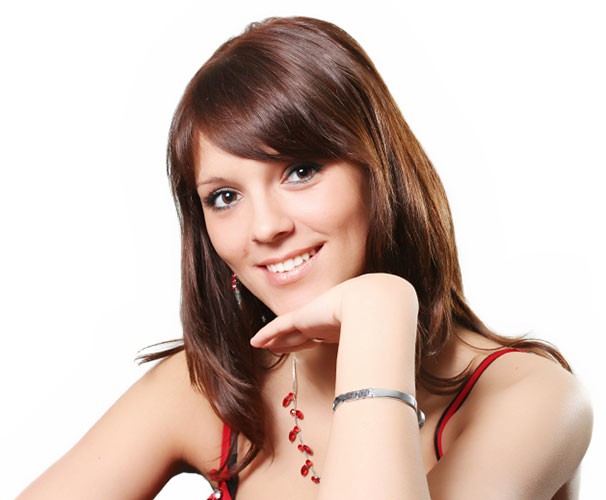
The original epitome.
We're going to be giving her hair a brighter, slightly more than ruddy colour to information technology in this tutorial, but you have complete command over the colour you use with your image, also as the intensity of the color. Here's how she'll await when we're done:
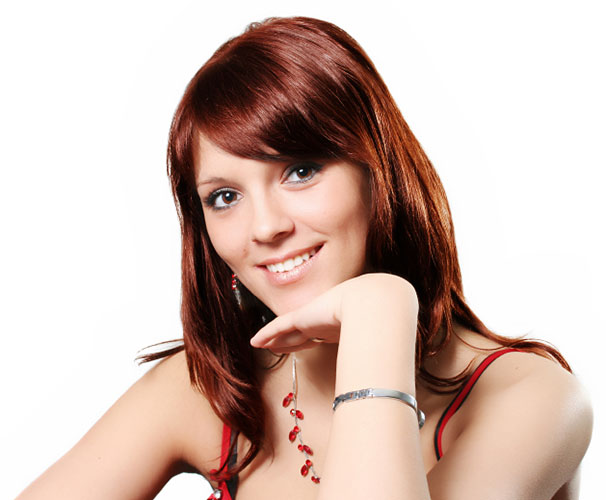
The concluding result.
At the finish of the tutorial, nosotros'll come across how easy it is to get back and change the color to something completely different.
This tutorial is part of our Portrait Retouching drove. Let'southward go started!
Pace 1: Add A "Hue/Saturation" Aligning Layer
With our image open up in Photoshop, click on the New Adjustment Layer icon at the lesser of the Layers palette (the circumvolve split diagonally between black and white):
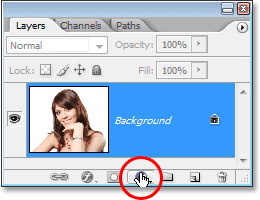
Click on the "New Aligning Layer" icon.
Then select Hue/Saturation from the list of adjustment layers that appears:
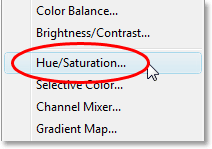
Select a "Hue/Saturation" adjustment layer.
Step 2: Select The "Colorize" Pick
When the Hue/Saturation dialog box opens, select the Colorize pick in the bottom right corner by clicking inside its checkbox:
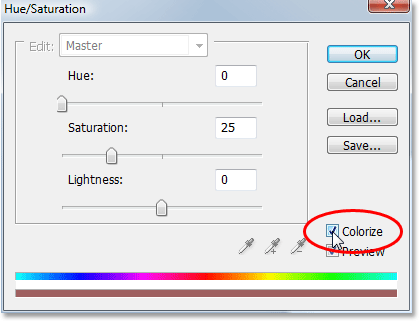
Select the "Colorize" option.
Every bit shortly as you select the Colorize choice, you'll see your entire image get colorized with a shade of red.
Step three: Select A New Color For The Hair
Drag the Hue slider left or right to select the color you lot want to apply for the person'south hair. For the moment, yous'll exist colorizing the entire image, but we'll prepare that in the next couple of steps. Just ignore the balance of the image for at present and focus merely on the pilus. Once y'all've found a color yous like, adjust the intensity of the color by dragging the Saturation slider left or correct. Dragging it to the right gives y'all a more saturated color, while dragging it to the left reduces the saturation.
Don't worry nigh getting the color and saturation perfect because you lot can always get back and change it quite easily later. I'm going to set up my Hue corporeality to about ix and increase the Saturation to around 45 for at present:
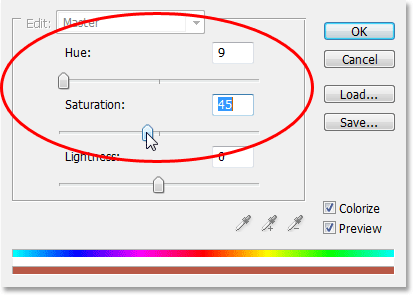
Utilise the Hue slider to select a new color for the hair and suit the intensity of the colour with the Saturation slider.
Click OK when you're done to exit out of the dialog box. The woman's hair now appears colorized in carmine, but then is the rest of her:
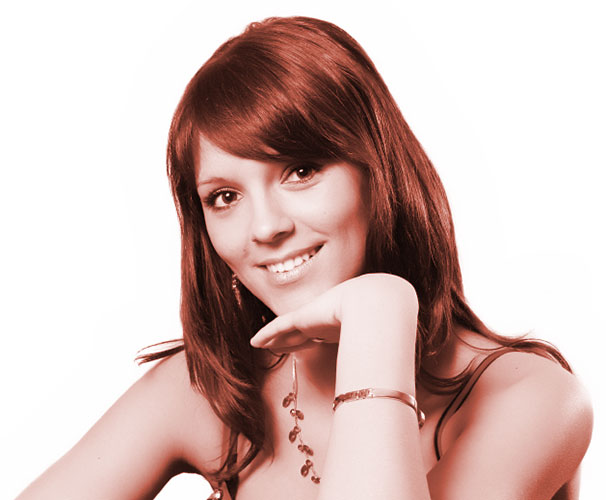
The unabridged image is now colorized in cherry-red.
Footstep 4: Fill The Hue/Saturation Layer's Mask With Black
Ane of the great things near adjustment layers in Photoshop is that each i automatically comes with its own layer mask, and we're going to use it to fix the trouble we currently accept with our unabridged image existence colorized when all we really want is for the hair to be colorized.
To beginning with, let's completely hide the effects of the Hue/Saturation adjustment layer past filling its layer mask with black. Since black is our current Groundwork colour and the layer mask is already selected (Photoshop automatically selected the layer mask for u.s.a. when we added the aligning layer and ready our Foreground and Background colors to white and black, respectively), all we need to exercise is use the keyboard shortcut Ctrl+Backspace (Win) / Control+Delete (Mac) to make full the layer mask with black.
As soon as we exercise, the colorizing effect disappears from our image and if we await in the Layers palette, we can see that the adjustment layer's thumbnail, which gives us a preview of what the layer mask looks like, is now filled with black:
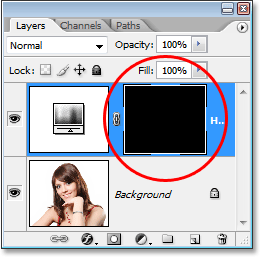
The Layers palette showing the layer mask thumbnail for the Hue/Saturation adjustment layer now filled with black.
Stride 5: Select The Brush Tool
To bring back the colorizing effect and have it applied only to the hair, all we demand to do is paint with white on our layer mask over the hair. Anywhere we paint with white on the layer mask will reveal the furnishings of the Hue/Saturation adjustment layer, and anywhere we get out black will continue the furnishings hidden. First, we need the Brush Tool, and then either select it from the Tools palette or press the letter of the alphabet B on your keyboard to select it with the shortcut:
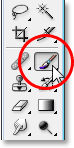
Select Photoshop'south Brush Tool.
We need to paint with white on the layer mask to reveal the colorizing outcome on the hair, and Photoshop has already ready our Foreground color to white for us, as we can run into in the Foreground and Background color swatches virtually the bottom of the Tools palette (the swatch on the left is the Foreground color and the swatch on the right is the Groundwork colour):
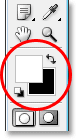
Photoshop'due south Tools palette showing white as our Foreground colour and black equally our Background color.
We besides already have our layer mask selected, and nosotros can tell that because the layer mask thumbnail in the Layers palette has a white highlight border around it, as shown in the image for Footstep iv to a higher place, which tells u.s. that the mask is selected.
Step vi: Paint With White Over The Hair
With our Castor Tool selected, the layer mask for the Hue/Saturation adjustment layer selected, and white as our Foreground colour, all we demand to do now is paint over the hair. To quickly change your castor size as you paint, employ the left and right subclass keys on your keyboard. The left bracket key makes the castor smaller and the right one makes information technology larger. You'll want to use a soft-edged brush, so hold down your Shift key and press the left subclass central a few times to soften its edges (holding Shift and pressing the right subclass central a few times makes the brush edges harder). And so merely paint over the hair to bring dorsum the colorizing result:
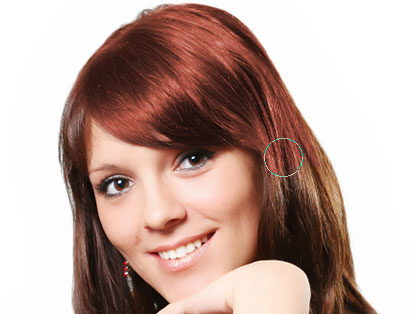
Paint with white over the hair to reveal the colorizing effect from the Hue/Saturation adjustment layer.
For trickier areas where there'south only loose strands of pilus, go upward to the Options Bar at the acme of the screen and lower the Opacity of the brush down to about 25% or so:

Lowering the opacity of the brush in the Options Bar.
And then lower the size of your brush so it's no bigger than the expanse you're colorizing and pigment over it a couple of times. This way, the color won't exist so intense in those areas. You may find information technology helps to zoom in on those areas besides, and the easiest manner to exercise that is to concur down the Ctrl (Win) / Command (Mac) fundamental and the Spacebar and drag a choice effectually the area. Photoshop will and then zoom into the expanse you selected:
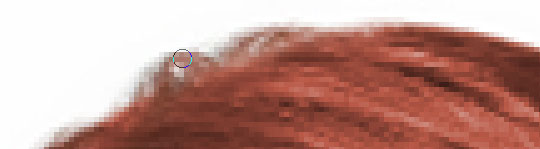
Zoom into the areas of loose strands if needed and pigment over them a couple of times with a lower opacity brush.
Press Ctrl+Alt+0 (Win) / Control+Option+0 (Mac) when you're done to zoom dorsum out to 100%.
If you make a mistake as you're painting and accidentally paint over an area you didn't mean to (happens all the time), simply press X to swap your Foreground and Background colors, making blackness your Foreground color, and paint over the fault to disengage it. Then press X again to set up your Foreground color back to white and continue painting until you have all the hair colorized:

The woman's hair is now colorized while the remainder of the image is not.
Nosotros'll await at how to fine-melody the event side by side!
Pace seven: Change The Blend Way To Either "Color" Or "Soft Light"
The hard part is done! We've colorized the pilus while leaving the rest of the image untouched thank you to the layer mask that came with the Hue/Saturation adjustment layer. At present we tin can fine-tune the effect, and the first mode to do that is by changing the blend manner of the adjustment layer. Past default, the blend fashion is set to "Normal", and it works fairly well, just allow'southward change information technology to something better. Go up to the blend way options in the meridian left corner of the Layers palette, click on the down-pointing arrow to the right of the word "Normal", and select either Color or Soft Light from the listing:
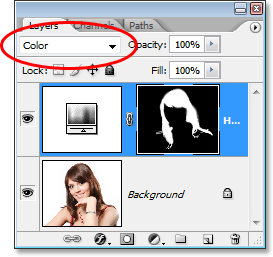
Change the alloy mode of the adjustment layer to either "Colour" or "Soft Light".
The "Color" blend manner gives us even more than of a colorizing outcome, since it changes only the color of an paradigm (when we had the blend mode gear up to "Normal", it was affecting not only the color simply also the lightness values of the hair). Hither'due south my prototype with the alloy mode of the adjustment layer set to "Colour":

The epitome with the blend mode of the adjustment layer set to "Color". Only the color of the pilus is being affected. The lightness values in the pilus are non being afflicted).
The "Soft Low-cal" blend mode gives u.s.a. a more dramatic colorizing result because information technology not only changes the color of the hair but besides boosts the contrast, which I recall works even better than the "Color" blend fashion in this example. Here's my prototype with the alloy fashion set to "Soft Light":

The image with the alloy mode of the adjustment layer set up to "Soft Light", giving us a more dramatic effect.
Cull the blend mode that works best with your image.
Step 8: Lower The Opacity Of The Aligning Layer If Needed
Some other way to fine-tune the colorizing event is past lowering the opacity of the adjustment layer. If you lot detect the colour is too intense, simply go upwardly to the Opacity choice in the top right corner of the Layers palette (across from the blend mode option) and lower information technology until you're happy with the results. Here, I've lowered the opacity of the adjustment layer to fifty%:
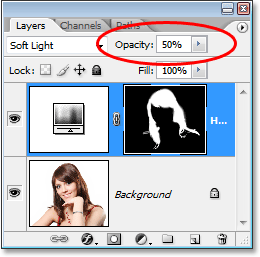
Lower the opacity of the adjustment layer for a more subtle colorizing result.
This gives me a more subtle colorizing effect:

The paradigm after lowering the opacity of the adjustment layer.
Pace 9: Edit The Hue/Saturation Settings To Change The Hair Color Equally Needed
At this point we're done, but if you demand to become back and modify the hair color to something dissimilar, just double-click on the Hue/Saturation aligning layer'south thumbnail in the Layers palette (the thumbnail on the left, not the layer mask thumbnail on the right):
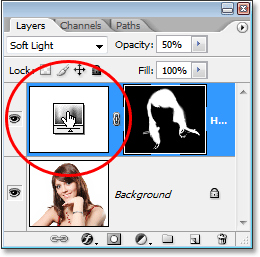
Double-click on the adjustment layer's thumbnail to edit the Hue/Saturation settings and change the hair color.
This brings the Hue/Saturation dialog box back up and nosotros can change the hair colour simply by dragging the Hue slider to something different. Nosotros can also re-adjust the saturation of the colour with the Saturation color. Since this is an aligning layer, we're free to brand as many changes every bit nosotros want without worrying about damaging our image. Just for fun, I'll ready my Hue slider to 304 to requite her hair more of a pink/purple look:
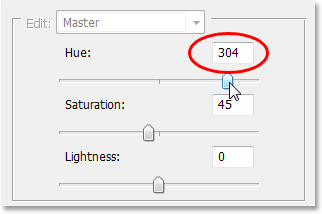
Adjust the Hue slider to modify the pilus colour again.
I'g also going to set the blend mode of the aligning layer back to "Colour" and increase the opacity to around 75%:
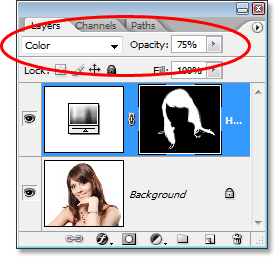
Setting the alloy mode dorsum to Color and raising the opacity to 75%.
And hither's my new event:
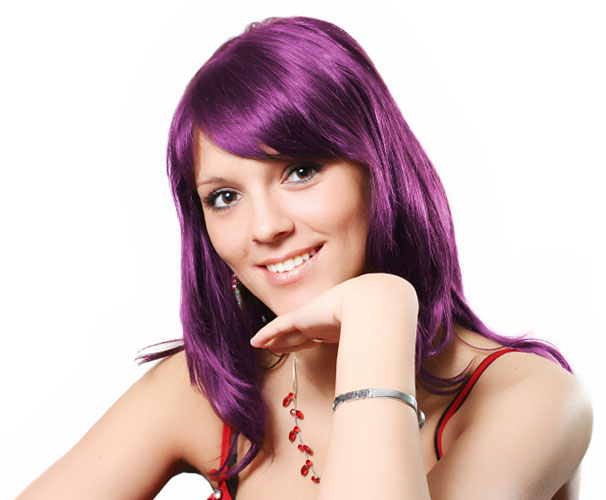
The paradigm afterChanging the pilus colour and saturation, blend manner and opacity value.
And there we have it! That'southward how like shooting fish in a barrel it is to change someone's pilus color in Photoshop! Bank check out our Photo Retouching section for more than Photoshop prototype editing tutorials!
Other Stuff
© 2022 Photoshop Essentials.com.
For inspiration, not duplication.
Site blueprint by Steve Patterson.
Photoshop is a trademark of Adobe Systems Inc.
Source: https://www.photoshopessentials.com/photo-editing/hair-color/
Posted by: grahamwhispored.blogspot.com
0 Response to "How To Change Hair Color In Photoshop 2018"
Post a Comment